A few (more) words about libraries
So far I have always included piControlIf.cpp, piContorlIf.hpp, and piControl.h in my projects. Since the files are always the same, it makes much more sense to make a library out of them. Linux (and other operating systems) distinguish between static and dynamic libraries. Static libraries are basically nothing more than a precompiled piece of program that is linked to the finished target program. The advantage is that the corresponding code does not have to be recompiled for each project. In addition, instead of many source code files, I may have only one library to include. Libraries in general have under Unix systems a “lib” at the beginning of the file name. Static libraries end with an “.a” and are usually written in lowercase.
Dynamic libraries, unlike static ones, are not part of the finished target program, but a reference is set. The library is only loaded at runtime. Under Linux dynamic libraries are called “Shared Objects”, which reflects in the file extension “.so”. Shared Object is actually more appropriate because these libraries are usually only available once in the system. Many programs share the library. This saves memory and allows an easy exchange of the library without touching the actual program.
For the sake of completeness, it must be mentioned that there is also a weakness of dynamic libraries. The target program usually does not bring the library itself but depends on the library being brought by the distribution. Often the libraries depend on other libraries. If the version of a library changes so that it is not downward compatible, all dependent programs and libraries must be updated. Although libraries can be kept in several versions, dependencies of the libraries among each other quickly lead to a confusing mess of versions and dependencies. Despite this lack, dynamic libraries are part of the basic structure of the Linux world, not least because security updates can be inserted very easily.
First steps with libraries
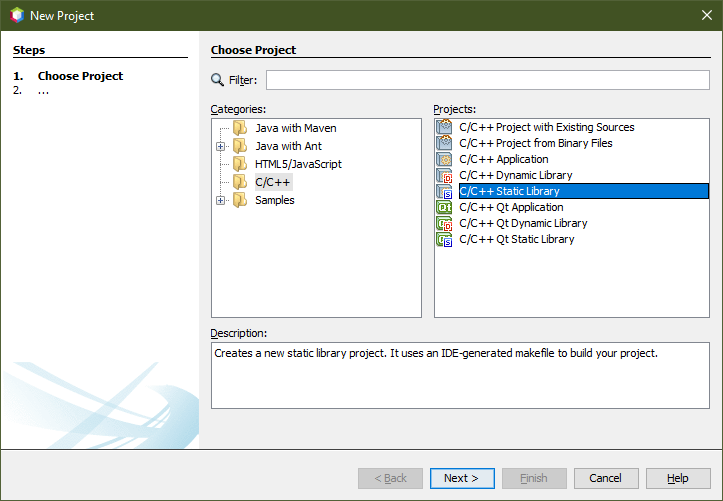
First I would like to create a small test library. Hierfür erzeugen wir ein neues Projekt. Netbeans already brings along a template for static libraries in which everything is already preset: New Project → C/C++ → C/C+ Static Library. Creative as I am, I call my project “StaticTestLibrary”.

A file called statictestlibrary.cpp is added to the project. In this file, I added a method with the meaningful name test(), which displays text on the console.
#include<stdio.h>

void test() {
    printf("Hello, this is the static test library");
}
The compiler creates the file statictestlibraray.o. This can be found in the project directory on the RevPi under build/Debug/GNU-Linux. When creating an application the linker would simply link all .o files together to the finished program. But I can also link the file to any program. If I want to create a static library I have to create an archive from it:
ar crs libstatictestlibrary.a statictestlibrary.o
The parameters crs mean
-
- c: force new version
- r: create, if not yet existing
- s: create index
The linker can use an archive like an .o file. An archive can of course contain several .o files. On several internet pages, I read that it is necessary to execute ranlib. The man-page of ar says: “Running ar s on an archive is equivalent to running ranlib on it.”. This looks to me strongly as if a separate ranlib run is superfluous.
Let’s see if everything worked out well. For this purpose, I am creating a new application project StaticTestLibraryDemo. I put the created library on the development computer into the directory of the new project with
scp pi@192.168.178.32:~/netbeansprojects/StaticTestLibrary/build/Debug/GNU-Linux/statictestlibrary.a .
To add the library open the project properties and choose Add Existing Item and select the file libstatictestlibrary.a. Adding the file to the project causes Netbeans to copy the file to the RevPi before creating the project.
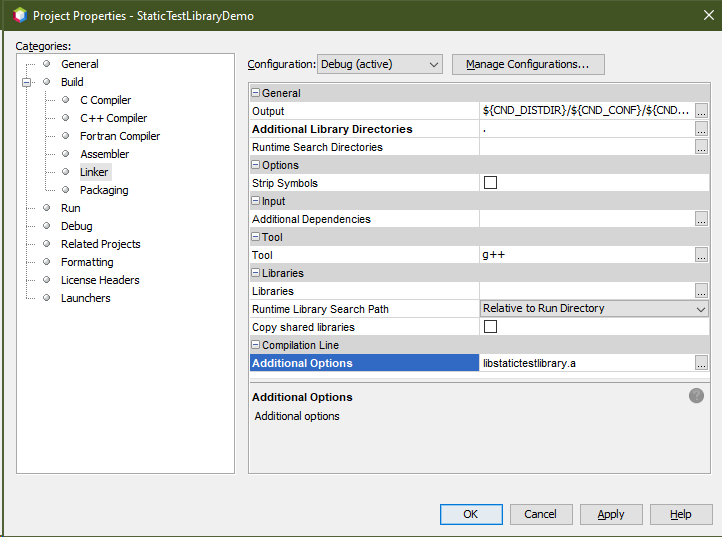
To include the library in the build process, choose Project Properties at Build → Linker and type in the library name in the line Additional Options.

I created a small test program that simply calls the method test() from the library.
void test();

int main(int argc, char** argv) {
    test();
    return 0;
}
The declaration void test(); is important. Otherwise, the compiler will complain because it does not know test(). Normally you create a header file with exactly this declaration for statictestlibrary and include it with #include in the target program. But for demonstration purposes, I kept it simple.
In the end, I also did some unnecessary work, because Netbeans creates the library completely automatically. When creating StaticTestLibrary you can find the file libstatictestlibrary.a under StaticTestLibrary/dist/Debug/GNU-Linux. Netbeans is also smart enough to add a “lib” to the front of the project name. Nevertheless, it is always good to know what is happening behind the scenes.
System-wide availability
To make libraries available system-wide Linux offers two possible storage locations: usr/lib and /usr/local/lib. The difference between the two directories is that /usr/lib should only contain files installed by the package manager. Files that are installed past the package manager should be stored in /usr/local.
Basically, /usr/local maps the structure as in /usr (only without local). The general rule is, files from the package manager are placed in the directories directly under /usr, everything that runs outside the package manager should be stored into /usr/local. This helps to keep an overview on your system. There is also no risk that the package manager will overwrite manually added files. The basic structure of the file system is described in the Filesystem Hierarchy Standard (FHS), so that the structure of Unix systems is largely identical and programs can be ported easily.
The file is copied to /usr/local/lib as described:
sudo cp libstatictestlibrary.a /usr/local/lib/
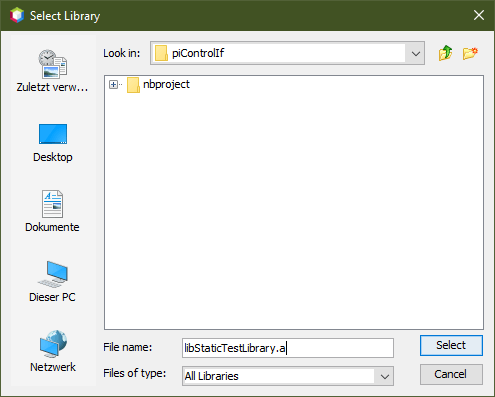
For testing, the compiler or linker must be told that it should include the library. This is done at Project Properties → Linker → Libraries → Add Library
Strangely you get to see a complete file dialog, but you just have to enter libStaticTestLibrary.a in the line File name: and click Select.

Now the program can be created and started as usual.
Here are the projects for StaticTestLibrary and the corresponding demo program.
