This tutorial demonstrates how to create a simple web visualization of traffic lights on the RevPi Connect using CODESYS WebVisu.
Prerequisites #
Hardware #
✓ RevPi Connect+
✓ RevPi DIO - digital I/O module
For detailed instructions about how to set up your system, see Getting Started.
Software #
✓ CODESYS Development System installed on your PC
To ensure a compatible system with suitable software, see CODESYS System Requirements.
Overview #
The application simulates a traffic light system with the following modes:
-
Normal Mode*:
-
Red and green lights are active for 10 seconds each.
-
Yellow light acts as a transition for 2 seconds.
-
-
Night Mode:
-
Only the yellow light flashes in this mode.
-
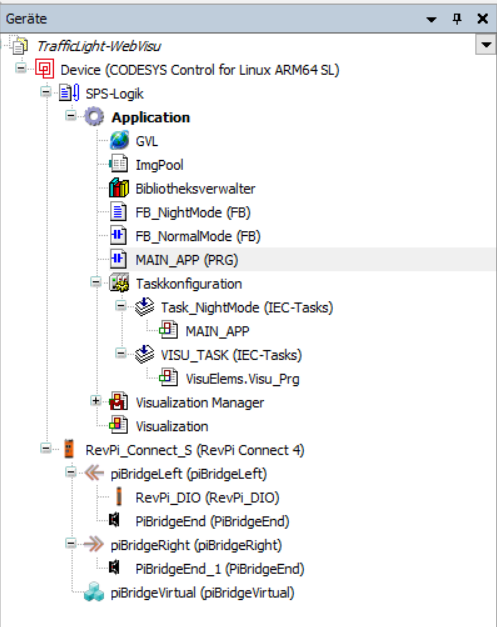
The following figure provides an overview of the CODESYS device tree for the setup:
Adapting for RevPi Core or RevPi Compact
To adapt the project for RevPi Core or RevPi Compact:
▷ Right-click on RevPi Connect in the CODESYS device tree.
▷ Select Update device.
▷ Choose RevPi Core or RevPi Compact as the replacement and rename the device accordingly.
Deploy and Test the Application #
-
Compile and Download:
▷ Ensure there are no errors in your program.
▷ Download the application to the RevPi Connect.
-
Access the Web Visualization:
▷ Open a browser and navigate to your RevPi Connect’s web server:
http://<RevPi-IP-Address>:8080/webvisu.htmExample: http://192.168.168.159:8080/webvisu.htm.
+ image::revpi-tutorial-trafficLight-Webvisu-01.png[Webvisu]
Adapting for RevPi Core or RevPi Compact*
-
Test the Traffic Light:
▷ Verify normal mode operation with the specified durations.
▷ Toggle the night mode switch and observe the yellow light flashing.
|
Note
|
▷ Ensure your RevPi Connect and RevPi DIO are properly connected and configured in the CODESYS device tree. |