Product Description #
The RevPi Con M-Bus modules are expansion modules for RevPi Connect. The module works with the Wireless M-Bus protocol (EN 13757-4). This protocol is used in building technology to read meter readings for gas, water, heat or electricity. However, you can also use it to integrate industrial wireless modules into your system at low cost.
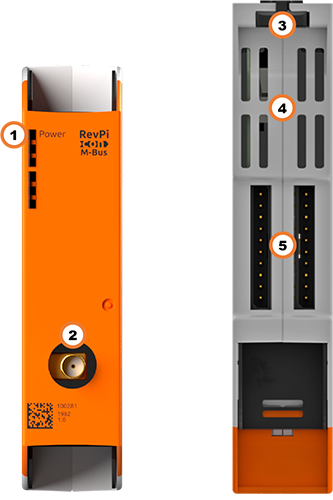
Components #
| Position | Component | Application |
|---|---|---|
1 |
Status LED |
Lights up green when the power supply is active |
2 |
SMA socket |
|
3 |
Locking clamps |
|
4 |
Ventilation Slots |
|
5 |
2× ConBridge |
Variants #
| Item No.: | Frequency band | Range |
|---|---|---|
100281RevPi Con M-Bus |
868 MHz |
approx. 800 m |
100330RevPi Con M-Bus VHP |
169 MHz |
approx. 20,000 m |
For available variants see Revolution Pi Shop.
LED #
Compatible Base Modules #
-
RevPi Connect SE
-
RevPi Connect+
-
RevPi Connect S
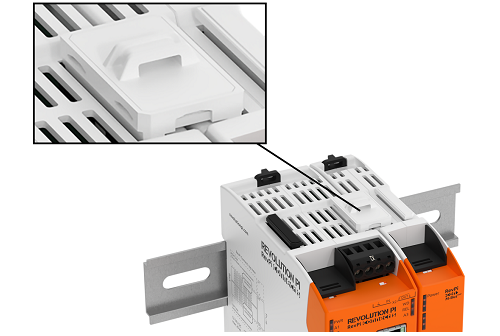
The RevPi Con modules can each be connected to the right-hand side of the base module via the ConBridge.
Mounting and Connecting #
The RevPi was developed for use in a control cabinet. Observe the specifications for the Intended Use and all Safety Instructions.
|
Warning
|
Danger to life due to electrical shock
There is a risk of fatal electrical shock when working on devices in the switch cabinet with 230 V mains voltage. ▷ Operations in the switch cabinet may only be carried out by qualified electricians. ▷ Before carrying out any operations in the switch cabinet, switch off the power supply properly. |
Carry out the installation and connection in the following order:
-
Mount your RevPi on the DIN rail.
-
Connect the RevPi Con module via the ConBridge plug connector.
-
Connect all other devices such as sensors and actuators.
-
As the last step connect the power supply.
Connecting RevPi Con Modules #
|
Important
|
Damage to the device due to installation under voltage supply
While the RevPi device is connected to a power source, no other devices may be connected or disconnected, as this may cause damage to the devices. ▷ Do not connect the power supply until all other devices are connected correctly. ▷ Switch off the power supply before disconnecting a device from the system. |
|
Important
|
Damage to the devices due to mix-up of the plug connectors
▷ Only connect RevPi I/O modules and RevPi gateways to the system via the black PiBridge plug connectors. ▷ Only connect RevPi Con M-Bus and RevPi Con CAN to the system via the gray ConBridge plug connectors. |
The RevPi Con modules are connected to a RevPi Connect base module via gray ConBridge plug connectors and supplied with power. A plug connector is included in the scope of delivery of a RevPi Con module or can be ordered via the store (article no. 100297).
RevPi Con modules can only be connected on the right-hand side of the following base modules.
| Left side | Base module | Right side |
|---|---|---|
5 × RevPi I/O module |
RevPi Connect SE |
1 × RevPi Con CAN, |
5 × RevPi I/O module, including 1 × RevPi Gateway |
RevPi Connect +, |
1 × RevPi Con CAN, |
▷ Mount your RevPi base module on the DIN rail.
▷ Mount the RevPi Con module to the right of the RevPi base module on the DIN rail.
▷ Connect the RevPi devices with the gray ConBridge plug connector on the top of the housing.
Select antenna #
To select a suitable antenna for RevPi Con M-Bus, you must observe the following device properties:
-
Antenna connection on the antenna: SMA Male with female thread
-
Frequency bands: 169MHz, 868MHz
-
Antenna gain: 0dBi
It is your responsibility to check whether the combination of antenna and RevPi Con Con M-Bus complies with the basic requirements of the Radio Equipment Directive (RED).
The RevPi Con M-Bus guarantees compliance with the directive applicable in the EU if you use an antenna with a maximum antenna gain of 0 dBi in the band.